As an Amazon Associate we earn from qualifying purchases.
Choosing the right studio monitor is important. Choosing the right wire for you monitor is just as crucial. Without proper wires, even the best quality monitors are just boxes filled with high tech components. Understanding and choosing the right studio monitor wire is essential for its optimum performance.
Table of Contents
Before understanding the wires specific to studio monitors, there are some general things that you need to know.
Wires vs. Cables
Before starting on monitor wires/cables, it is important to understand the difference between wires and cables. This is important because in a lot of places, these terms are used interchangeably, but there is still a difference between them.
A wire is a single conduit, a carrier, a path through which electricity travels. Whether it’s electrical power or a signal, it cannot travel without a conductive material, like a wire.
A cable is simply a combination of wires. Most electrical signals, like the ones from an amplifier to a speaker or a digital piano to its output speakers, travel through a combination of wires. Therefore the word cable is more commonplace when we talk about connecting home studio monitors.
Output vs. Input
This is a pretty easy concept, but we’ll go over it again with regard to wires and studio monitors. At the back of most studio speakers, there are some ports outlined as “inputs”. These ports are the connectors from which a studio monitor accepts audio. Audio, that is coming from a cable.
Now the other end of the cable maybe connected to any source, a computer or an audio interface unit, or even an instrument. The port at that source can be called “output” because this is where the sound is coming out from.
So a studio monitors, whatever cable you choose will be bringing the signal in. Knowing the port is a very simple way to know what kind of cable it will accept.
Digital vs. Analog Signal
While a whole book can be written to explain these two types of signals and their differences, we won’t discuss them in that much detail.
The only thing you need to understand is that most studio monitors accept Analog signals. While a few high-end monitors like the Adam S2V or Hedd Audio Type 20 allow digital connectivity, they still have the option for analog inputs as well.
The terms related to these two are:
Analog Inputs: XLR, TRS, TS, RCA, Aux
Digital Inputs: USB, Bluetooth and some others specific to monitor manufacturers
Cables for Studio Monitors
Now let’s take a look at the different kinds of studio monitor cables there are.
Balanced and Unbalanced Cables
The first classification you will see in cables for studio monitors is whether the cable is balanced or unbalanced. While common sense tells us that balanced is definitely better than unbalanced (and it’s right), there is a simple difference.
Unbalanced Cables
An unbalanced cable is a two-wire cable with no special protection against noise. Noise is any kind of interference that distorts your sound signal. The electromagnetic waves from your phone, other speakers, hard drive magnets etc. Unbalanced cables lying near any of these are susceptible to noise in the signal. A noisy signal may include buzzing or a static sound when you hear it.
The two-wire configuration means that it has just two wires. One is for signal, which carries the sound, and the other cable is ground. Ground is for reference and providing limited protection for the signal.
Though it sound bad, and you might wonder why these cables are used at all, the fact is that guitars and most other instruments cannot produce a balanced sound. In small cable lengths (ideally under 20 feet), these noises are tolerable. For longer cables, a Direct Injection (DI) box converts unbalanced signal to balanced signal.
So, if you are connecting a guitar or another instrument directly to a studio monitor with a small cable, an unbalanced cable would be fine.
Balanced Cables
Now balanced cables employ a three-wire configuration. This setup, with two signal cables and one ground cable, was specifically designed eliminate any noise the signal might pick up during its travel.
How it does that is fairly simple. Let’s say our balanced cable has three wires, A, B and G. G is ground so we are going to leave that. A and B are two signal cables. The signal is sent though both cables, the only difference is that it is inverted. The highs in A are the lows in B and vice versa.
Now when the signal reaches its destination, both A and B are filled with noise. But at the destination, we realign the inverted signal in B and combine it with the signal in A. Now understand that the noise picked up by both the signals was the same. Now that we have inverted the B signal, its noise is the opposite of what it is in A. So both noises cancel each other out and signal is squeaky clean.
Balanced cables are generally considered ideal when you are connecting your studio monitor with the computer or an audio interface unit.
Balanced All the Way
To get the maximum efficiency out of a balanced connection, you should understand that all three elements of the connection need to be balanced. The output where signal starts for a monitor, the cable itself, and the input port of the monitor.
If any of these three elements is unbalanced in configuration, the signal will mostly be unbalanced.
Now that we have understood the difference between balanced and unbalanced cables, let’s move on to the connectors/ports. You see a cable is chiefly identified with the connector on either end. When we say that we need an XLR, RCA or a TRS cable, we are referring to the connectors these cables have.
Analog Connectors
There are chiefly four kinds of analog connectors you will find in studio monitors.
XLR
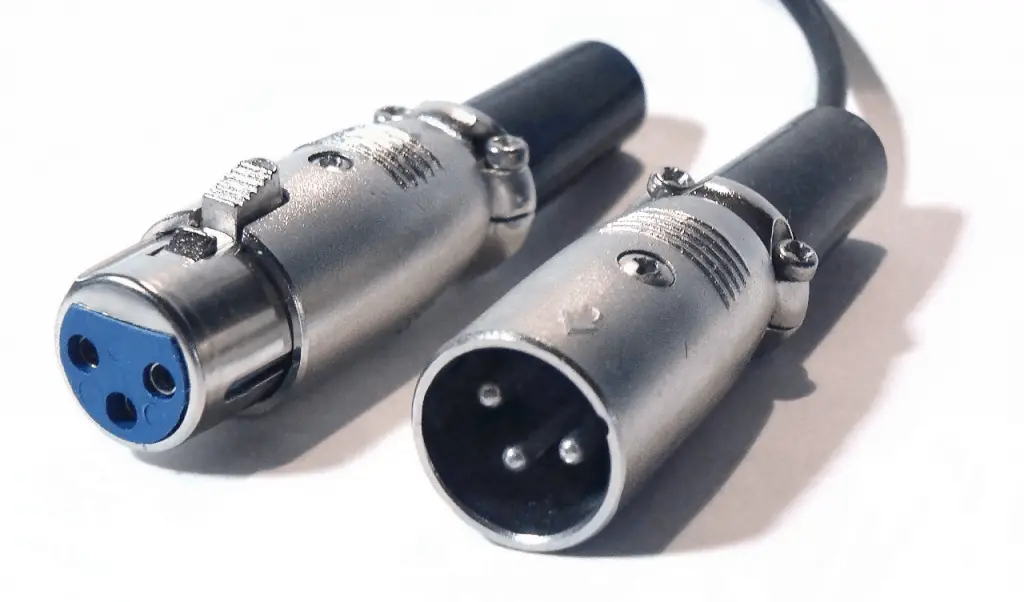
The most common type of balanced connecter used in studio monitors. It has a 3 wire configuration, and male or female XLR connectors. At the start of this article, the picture shows female XLR port/connector, and on the right is the male XLR connector.
You will usually find the female XLR port at the back of a studio monitor. This will accept an XLR cable with a male XLR connecter at an end. Apart from being balanced, it has an advantage of properly locking down when connected. So it won’t get loose if you frequently plug and unplug your cables.
XLR stands for eXternal Line extendeR.
TRS
The other most commonly used monitor connector and cable is the balanced TRS. This is short for Tip Ring Sleeve.

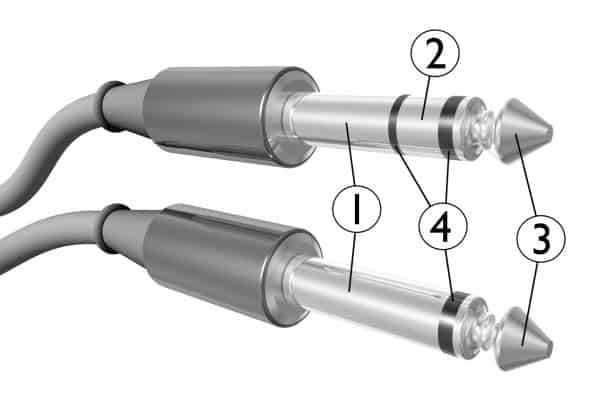
In this picture, the connector above is TRS. Its characteristic sign is two rings. These black rings are insulators between three wires of TRS.
3 is Tip, for one wire, 2 is Ring for second wire and 1 is sleeve for the third wire.
This is also called a ¼” jack, to differentiate it from the ones found in cell phones and computer audio outputs.
It is also important to note that the commonly found 3.5mm jack also acts the same way as a TRS ¼” one. So if a monitor is connected through that, it will also be a balanced connection.
TS
TS is the unbalanced version of the TSR, The tip and sleeve without the ring. It has a two-cable configuration. Its size is also ¼”.
RCA
RCA (Radio Corporation of America) connector is another unbalanced connector found in studio monitors. You may be familiar with it if you have ever seen or video tape players connected to an old TV, with three red, yellow and white cables, although monitors use only one RCA cable.
Digital Cables and Connectors
Even if analog cables are most widely used, digital monitors cables are making their way in. The most common digital monitor cables are of course USB. But many studio monitors have their own patented digital connectors and cables.
Digital cables provide a better signal processing and reaction time since the signal already converted to digital does not need to be reconverted. Digital cables are also immune to noise.
Conclusion
Though a monitor wire is considered an insignificant choice to make when compared to the monitor itself, it is an equally important one. What you are connecting to your monitor usually dictates the kind of cable you use. But whenever you have a choice between the two, always go for a balanced cable for better results.
Amazon and the Amazon logo are trademarks of Amazon.com, Inc, or its affiliates.
